
核心原理
SIFT(Scale-Invariant Feature Transform,尺度不变特征变换)通过构建尺度空间和高斯差分金字塔来检测关键点,具有以下特性:
- 尺度不变性:对图像缩放保持稳定
- 旋转不变性:对图像旋转保持稳定
- 光照不变性:对光照变化具有鲁棒性
- 仿射不变性:对一定程度的仿射变换保持稳定
数学公式
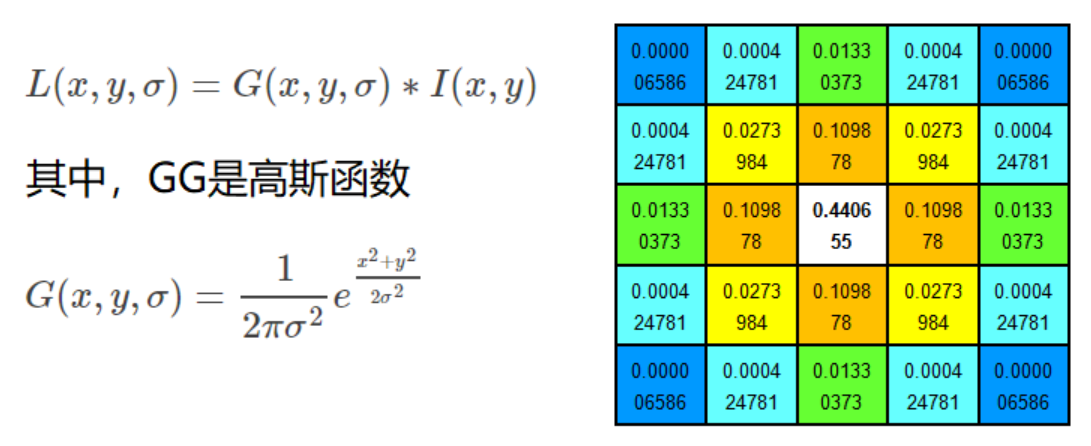
高斯尺度空间
高斯函数:
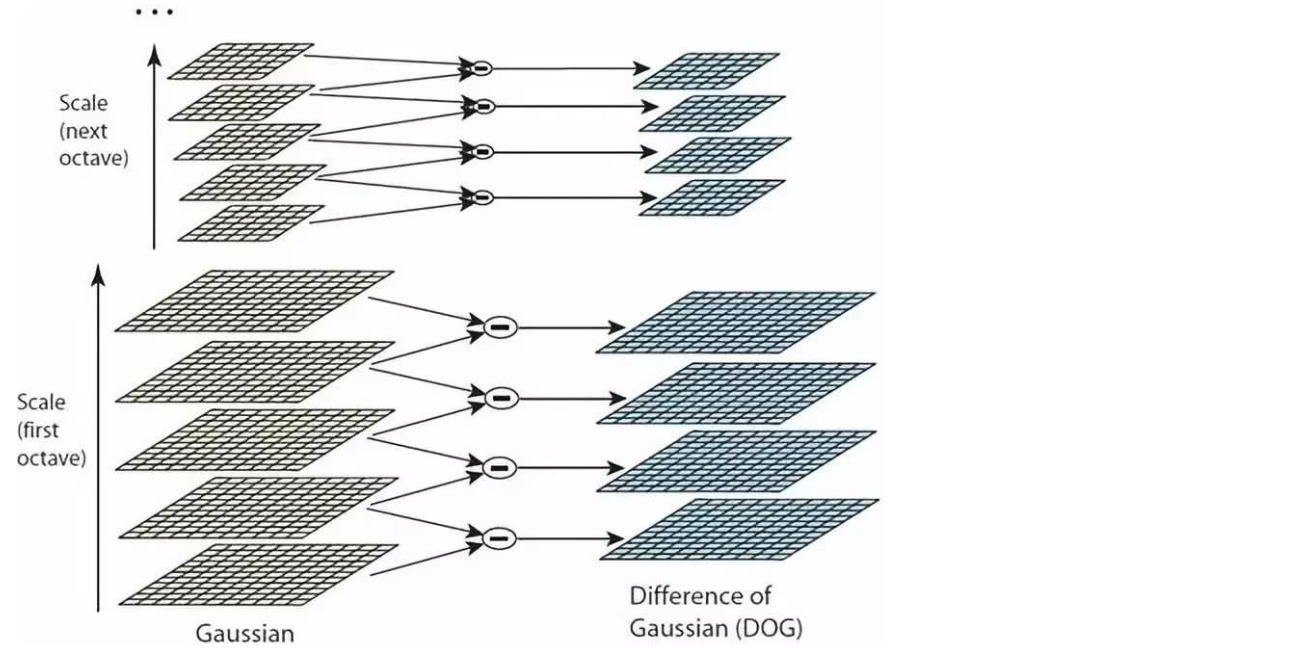
高斯差分(DoG)
其中
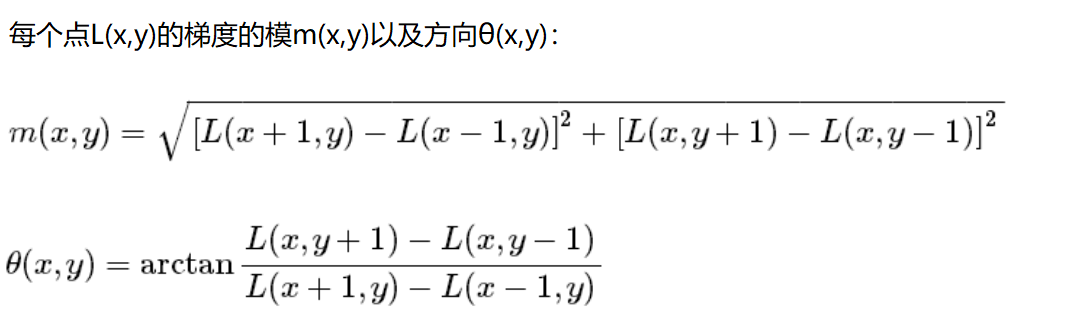
梯度幅值和方向
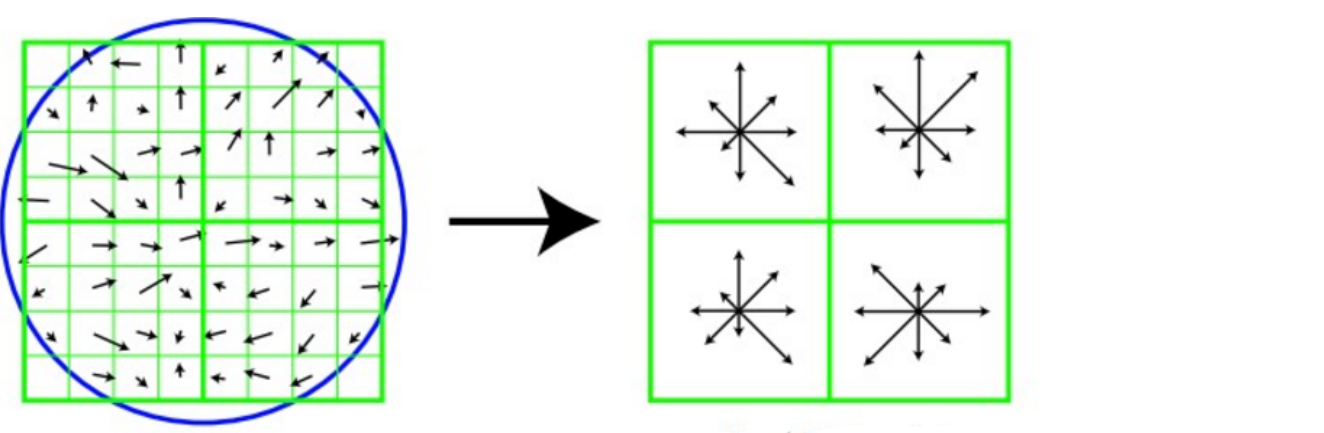
特征描述子
SIFT 描述子是一个 128 维的向量,通过以下步骤生成:
- 在关键点周围选择 16×16 的窗口
- 将窗口分成 4×4 的子区域
- 在每个子区域计算 8 个方向的梯度直方图
- 归一化得到 128 维向量:
流程图
graph LR
    A[输入图像] --> B[构建高斯金字塔]
    B --> C[计算DoG金字塔]
    C --> D[DoG空间极值检测]
    D --> E[关键点精确定位]
    E --> F[消除边界响应]
    F --> G[计算主方向]
    G --> H[生成特征描述子]
    H --> I[归一化处理]

    style A fill:#FF3D71,stroke:#FFFFFF,stroke-width:3px,color:#FFFFFF
    style B fill:#00D4FF,stroke:#FFFFFF,stroke-width:3px,color:#FFFFFF
    style C fill:#00C851,stroke:#FFFFFF,stroke-width:3px,color:#FFFFFF
    style D fill:#FF9500,stroke:#FFFFFF,stroke-width:3px,color:#FFFFFF
    style E fill:#9C27B0,stroke:#FFFFFF,stroke-width:3px,color:#FFFFFF
    style F fill:#E91E63,stroke:#FFFFFF,stroke-width:3px,color:#FFFFFF
    style G fill:#FF5722,stroke:#FFFFFF,stroke-width:3px,color:#FFFFFF
    style H fill:#4CAF50,stroke:#FFFFFF,stroke-width:3px,color:#FFFFFF
    style I fill:#2196F3,stroke:#FFFFFF,stroke-width:3px,color:#FFFFFF
SIFT 算法详细步骤
1. 尺度空间构建
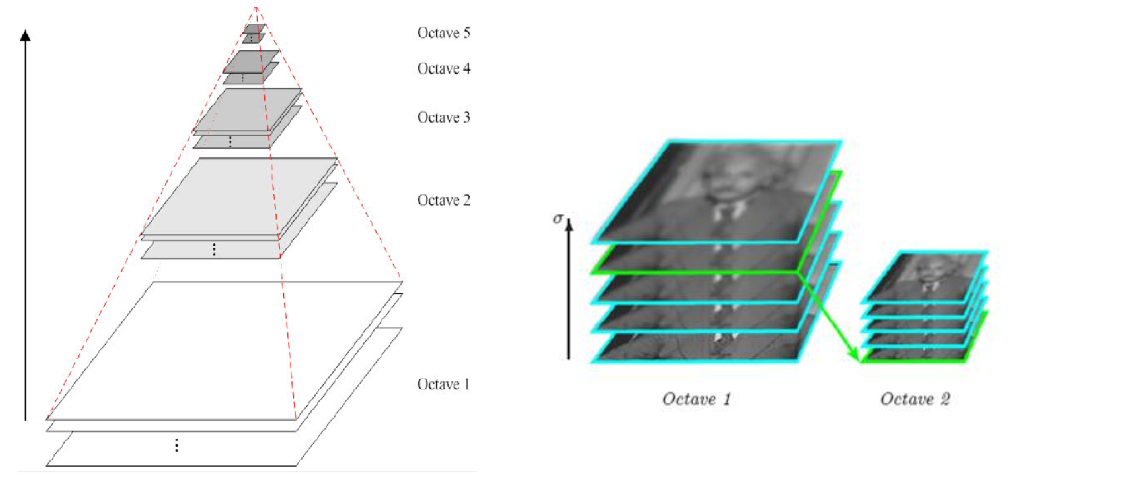
使用不同
实现细节:
- 每个 octave 包含多个尺度层
- 相邻尺度层之间的比例关系为
- 通常每个 octave 包含 5-6 层
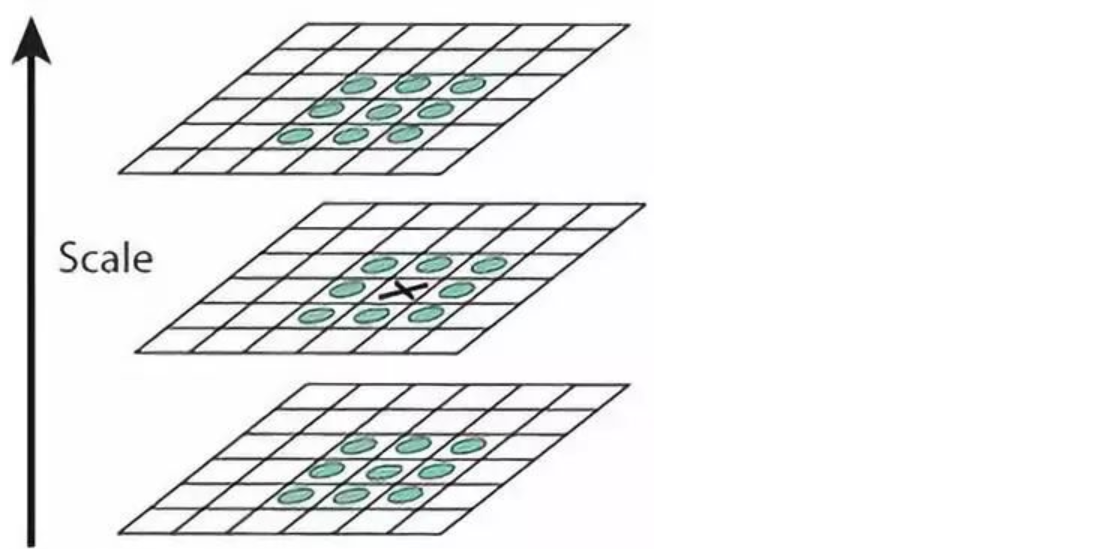
2. DoG 空间极值检测
在 DoG 金字塔中寻找局部极值点。每个像素点需要与其 26 个邻域点进行比较:
- 同层的 8 个邻域点
- 上层的 9 个邻域点
- 下层的 9 个邻域点
3. 关键点精确定位
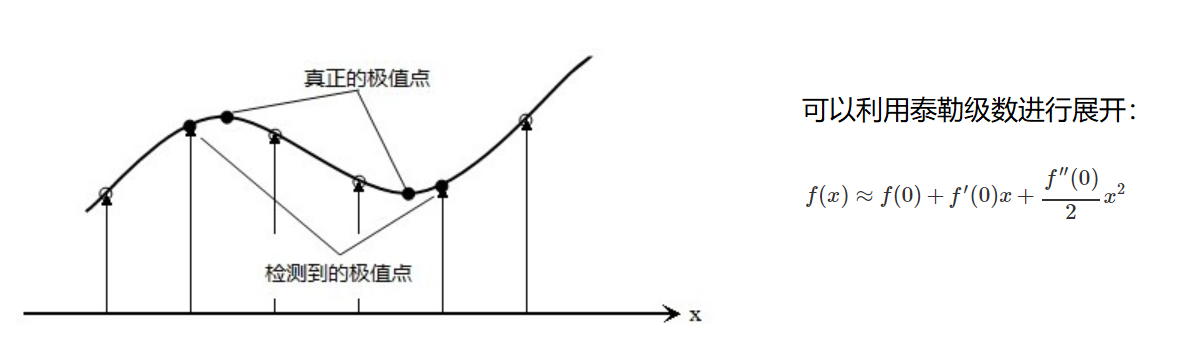
使用泰勒展开式精确定位极值点:
4. 消除边界响应
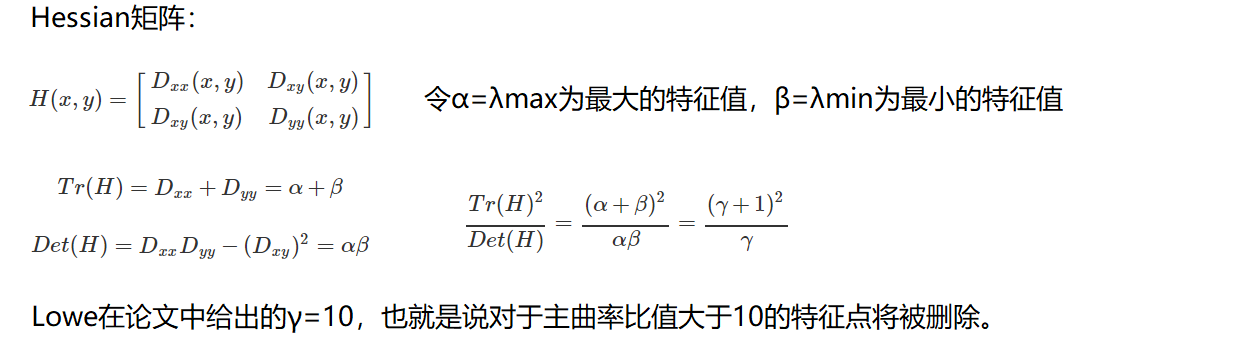
使用 Hessian 矩阵的特征值比值来消除边界响应:
5. 方向分配
计算关键点的主方向,每个特征点可以得到四个信息:
6. 特征描述子生成
在关键点周围取 16×16 的窗口,分成 4×4 的子区域,每个子区域计算 8 个方向的梯度直方图。
OpenCV 实现
import cv2
import numpy as np
import matplotlib.pyplot as plt

# 基本SIFT特征检测
def sift_feature_detection(image_path):
    """SIFT特征检测基本实现"""
    # 读取图像
    img = cv2.imread(image_path)
    if img is None:
        print(f"无法读取图像: {image_path}")
        return None, None, None

    gray = cv2.cvtColor(img, cv2.COLOR_BGR2GRAY)

    # 创建SIFT检测器
    sift = cv2.SIFT_create()

    # 检测关键点和计算描述符
    kp, des = sift.detectAndCompute(gray, None)

    # 绘制关键点
    img_with_keypoints = cv2.drawKeypoints(
        img, kp, None,
        flags=cv2.DRAW_MATCHES_FLAGS_DRAW_RICH_KEYPOINTS
    )

    print(f"检测到 {len(kp)} 个关键点")
    if des is not None:
        print(f"描述符维度: {des.shape}")

    return img_with_keypoints, kp, des

# 使用示例
img_path = '/images/notes/opencv/test_1.jpg'
result, keypoints, descriptors = sift_feature_detection(img_path)
if result is not None:
    cv2.imshow('SIFT Features', result)
    cv2.waitKey(0)
    cv2.destroyAllWindows()
函数详解
cv2.SIFT_create(nfeatures=0, nOctaveLayers=3, contrastThreshold=0.04, edgeThreshold=10, sigma=1.6)
功能: 创建 SIFT 特征检测器
参数:
nfeatures: 保留的最佳特征数量 (int)
- 0: 不限制特征数量
- 正整数: 保留指定数量的最佳特征
nOctaveLayers: 每个 octave 的层数 (int)
- 默认值: 3
- 取值范围: 通常为 2-4
- 影响尺度空间的精度
contrastThreshold: 对比度阈值 (float)
- 默认值: 0.04
- 用于过滤弱特征点
- 值越大,检测到的特征点越少
edgeThreshold: 边缘阈值 (float)
- 默认值: 10
- 用于过滤边缘响应
- 值越大,过滤越少的边缘点
sigma: 高斯核标准差 (float)
- 默认值: 1.6
- 影响初始高斯模糊程度
返回值: SIFT 检测器对象
detectAndCompute(image, mask=None)
功能: 检测关键点并计算描述符
参数:
image: 输入的灰度图像 (numpy.ndarray)mask: 感兴趣区域掩码 (numpy.ndarray, 可选)返回值:
keypoints: 关键点列表 (list of cv2.KeyPoint)descriptors: 描述符数组 (numpy.ndarray),形状为(N, 128)注意: 如果未检测到关键点,描述符为 None
cv2.drawKeypoints(image, keypoints, outImage, color=None, flags=0)
功能: 在图像上绘制关键点
参数:
image: 输入图像 (numpy.ndarray)keypoints: 关键点列表 (list of cv2.KeyPoint)outImage: 输出图像 (numpy.ndarray, 可以为 None)color: 绘制颜色 (tuple, 可选)flags: 绘制标志 (int)
cv2.DRAW_MATCHES_FLAGS_DEFAULT: 只绘制关键点中心cv2.DRAW_MATCHES_FLAGS_DRAW_RICH_KEYPOINTS: 绘制关键点的尺寸和方向返回值: 绘制了关键点的图像 (numpy.ndarray)
参数调优与示例
不同参数组合比较
def sift_parameter_comparison(image_path):
    """SIFT特征检测参数比较"""
    img = cv2.imread(image_path)
    if img is None:
        print(f"无法读取图像: {image_path}")
        return

    gray = cv2.cvtColor(img, cv2.COLOR_BGR2GRAY)

    # 不同参数组合的测试
    parameters = [
        {'nfeatures': 0, 'contrastThreshold': 0.04, 'title': '默认参数'},
        {'nfeatures': 500, 'contrastThreshold': 0.04, 'title': '限制500个特征'},
        {'nfeatures': 0, 'contrastThreshold': 0.08, 'title': '高对比度阈值'},
        {'nfeatures': 0, 'contrastThreshold': 0.02, 'title': '低对比度阈值'},
    ]

    plt.figure(figsize=(16, 8))

    for i, params in enumerate(parameters):
        # 创建SIFT检测器
        sift = cv2.SIFT_create(
            nfeatures=params['nfeatures'],
            contrastThreshold=params['contrastThreshold']
        )

        # 检测关键点
        kp, des = sift.detectAndCompute(gray, None)

        # 绘制关键点
        img_with_keypoints = cv2.drawKeypoints(
            img, kp, None,
            flags=cv2.DRAW_MATCHES_FLAGS_DRAW_RICH_KEYPOINTS
        )

        # 显示结果
        plt.subplot(2, 2, i+1)
        plt.imshow(cv2.cvtColor(img_with_keypoints, cv2.COLOR_BGR2RGB))
        plt.title(f"{params['title']}\n检测到 {len(kp)} 个关键点")
        plt.axis('off')

    plt.tight_layout()
    plt.show()
改进的 SIFT 特征检测
def enhanced_sift_detection(image_path, **kwargs):
    """增强版SIFT特征检测"""
    # 默认参数
    params = {
        'nfeatures': 0,
        'nOctaveLayers': 3,
        'contrastThreshold': 0.04,
        'edgeThreshold': 10,
        'sigma': 1.6,
        'use_clahe': True,
        'roi_rect': None
    }
    params.update(kwargs)

    img = cv2.imread(image_path)
    if img is None:
        print(f"无法读取图像: {image_path}")
        return None, None, None

    gray = cv2.cvtColor(img, cv2.COLOR_BGR2GRAY)

    # 可选的对比度增强
    if params['use_clahe']:
        clahe = cv2.createCLAHE(clipLimit=2.0, tileGridSize=(8, 8))
        gray = clahe.apply(gray)

    # 创建掩码(如果指定了ROI)
    mask = None
    if params['roi_rect'] is not None:
        mask = np.zeros(gray.shape[:2], dtype=np.uint8)
        x, y, w, h = params['roi_rect']
        mask[y:y+h, x:x+w] = 255

    # 创建SIFT检测器
    sift = cv2.SIFT_create(
        nfeatures=params['nfeatures'],
        nOctaveLayers=params['nOctaveLayers'],
        contrastThreshold=params['contrastThreshold'],
        edgeThreshold=params['edgeThreshold'],
        sigma=params['sigma']
    )

    # 检测关键点和计算描述符
    kp, des = sift.detectAndCompute(gray, mask)

    # 绘制关键点
    result = cv2.drawKeypoints(
        img, kp, None,
        flags=cv2.DRAW_MATCHES_FLAGS_DRAW_RICH_KEYPOINTS
    )

    # 绘制ROI区域
    if params['roi_rect'] is not None:
        x, y, w, h = params['roi_rect']
        cv2.rectangle(result, (x, y), (x+w, y+h), (0, 255, 0), 2)

    print(f"检测到 {len(kp)} 个关键点")
    return result, kp, des

# 使用示例
result, kp, des = enhanced_sift_detection('images/test_1.jpg',
                                         nfeatures=1000,
                                         contrastThreshold=0.03,
                                         use_clahe=True)
if result is not None:
    cv2.imshow('Enhanced SIFT', result)
    cv2.waitKey(0)
    cv2.destroyAllWindows()
实用技巧与最佳实践
SIFT 特征检测优化技巧
def optimized_sift_detection(image_path, **kwargs):
    """优化的SIFT特征检测"""
    # 默认参数
    params = {
        'nfeatures': 0,
        'contrastThreshold': 0.04,
        'edgeThreshold': 10,
        'use_preprocessing': True,
        'use_roi': False,
        'roi_rect': None
    }
    params.update(kwargs)

    img = cv2.imread(image_path)
    if img is None:
        print(f"无法读取图像: {image_path}")
        return None, None, None

    gray = cv2.cvtColor(img, cv2.COLOR_BGR2GRAY)

    # 预处理优化
    if params['use_preprocessing']:
        # 1. 直方图均衡化
        clahe = cv2.createCLAHE(clipLimit=2.0, tileGridSize=(8, 8))
        gray = clahe.apply(gray)

        # 2. 高斯滤波降噪
        gray = cv2.GaussianBlur(gray, (3, 3), 0)

    # ROI处理
    mask = None
    if params['use_roi'] and params['roi_rect'] is not None:
        mask = np.zeros(gray.shape[:2], dtype=np.uint8)
        x, y, w, h = params['roi_rect']
        mask[y:y+h, x:x+w] = 255

    # SIFT检测
    sift = cv2.SIFT_create(
        nfeatures=params['nfeatures'],
        contrastThreshold=params['contrastThreshold'],
        edgeThreshold=params['edgeThreshold']
    )

    kp, des = sift.detectAndCompute(gray, mask)

    # 绘制结果
    result = cv2.drawKeypoints(
        img, kp, None,
        flags=cv2.DRAW_MATCHES_FLAGS_DRAW_RICH_KEYPOINTS
    )

    return result, kp, des

# 使用示例
result, kp, des = optimized_sift_detection('/images/notes/opencv/test_1.jpg',
                                          nfeatures=1000,
                                          contrastThreshold=0.03,
                                          use_preprocessing=True)
if result is not None:
    print(f"检测到 {len(kp)} 个优化的SIFT特征点")
性能优化建议
参数调优策略:
- 根据应用场景调整
nfeatures限制特征数量 - 提高
contrastThreshold减少弱特征 - 调整
edgeThreshold过滤边缘响应
- 根据应用场景调整
预处理优化:
- 使用 CLAHE 增强对比度
- 适当的高斯滤波减少噪声
- 考虑图像尺寸对性能的影响
内存管理:
- 及时释放大型特征描述符
- 使用 ROI 减少计算区域
- 合理设置特征数量上限
匹配质量评估
def evaluate_sift_quality(image_path):
    """评估SIFT特征质量"""
    img = cv2.imread(image_path)
    if img is None:
        return None

    gray = cv2.cvtColor(img, cv2.COLOR_BGR2GRAY)

    # SIFT检测
    sift = cv2.SIFT_create()
    kp, des = sift.detectAndCompute(gray, None)

    if des is None:
        print("未检测到特征点")
        return None

    # 特征质量分析
    quality_metrics = {
        'total_features': len(kp),
        'descriptor_dimension': des.shape[1],
        'response_stats': {
            'max_response': max([k.response for k in kp]),
            'min_response': min([k.response for k in kp]),
            'avg_response': np.mean([k.response for k in kp])
        },
        'scale_stats': {
            'max_size': max([k.size for k in kp]),
            'min_size': min([k.size for k in kp]),
            'avg_size': np.mean([k.size for k in kp])
        }
    }

    print("SIFT特征质量评估:")
    print(f"总特征数: {quality_metrics['total_features']}")
    print(f"描述符维度: {quality_metrics['descriptor_dimension']}")
    print(f"响应值范围: {quality_metrics['response_stats']['min_response']:.3f} - {quality_metrics['response_stats']['max_response']:.3f}")
    print(f"平均响应值: {quality_metrics['response_stats']['avg_response']:.3f}")
    print(f"尺度范围: {quality_metrics['scale_stats']['min_size']:.1f} - {quality_metrics['scale_stats']['max_size']:.1f}")

    return quality_metrics

# 使用示例
metrics = evaluate_sift_quality('/images/notes/opencv/test_1.jpg')
常见问题与解决方案
1. 特征点检测过多或过少
# 解决方案:动态调整参数
def adaptive_sift_detection(image_path, target_features=500):
    """自适应SIFT特征检测"""
    img = cv2.imread(image_path)
    if img is None:
        return None, None, None

    gray = cv2.cvtColor(img, cv2.COLOR_BGR2GRAY)

    # 尝试不同的对比度阈值
    thresholds = [0.02, 0.04, 0.06, 0.08, 0.10]

    for threshold in thresholds:
        sift = cv2.SIFT_create(
            nfeatures=target_features * 2,  # 设置较高上限
            contrastThreshold=threshold
        )

        kp, des = sift.detectAndCompute(gray, None)

        print(f"阈值 {threshold}: 检测到 {len(kp)} 个特征点")

        # 如果特征数量合适,返回结果
        if target_features * 0.8 <= len(kp) <= target_features * 1.2:
            result = cv2.drawKeypoints(img, kp, None,
                                     flags=cv2.DRAW_MATCHES_FLAGS_DRAW_RICH_KEYPOINTS)
            return result, kp, des

    # 如果没有找到合适的阈值,使用默认参数
    sift = cv2.SIFT_create(nfeatures=target_features)
    kp, des = sift.detectAndCompute(gray, None)
    result = cv2.drawKeypoints(img, kp, None,
                             flags=cv2.DRAW_MATCHES_FLAGS_DRAW_RICH_KEYPOINTS)

    return result, kp, des
2. 图像质量问题
# 解决方案:图像增强预处理
def enhanced_image_sift(image_path):
    """处理低质量图像的SIFT检测"""
    img = cv2.imread(image_path)
    if img is None:
        return None, None, None

    gray = cv2.cvtColor(img, cv2.COLOR_BGR2GRAY)

    # 检查图像质量
    laplacian_var = cv2.Laplacian(gray, cv2.CV_64F).var()
    print(f"图像清晰度指标: {laplacian_var:.2f}")

    # 根据图像质量选择不同的预处理策略
    if laplacian_var < 100:  # 图像较模糊
        print("检测到模糊图像,应用锐化处理")
        kernel = np.array([[-1,-1,-1], [-1,9,-1], [-1,-1,-1]])
        gray = cv2.filter2D(gray, -1, kernel)

    # 对比度增强
    clahe = cv2.createCLAHE(clipLimit=3.0, tileGridSize=(8, 8))
    gray = clahe.apply(gray)

    # 降噪
    gray = cv2.bilateralFilter(gray, 9, 75, 75)

    # SIFT检测
    sift = cv2.SIFT_create(contrastThreshold=0.03)  # 降低阈值以检测更多特征
    kp, des = sift.detectAndCompute(gray, None)

    result = cv2.drawKeypoints(img, kp, None,
                             flags=cv2.DRAW_MATCHES_FLAGS_DRAW_RICH_KEYPOINTS)

    return result, kp, des
3. 内存和性能问题
# 解决方案:批量处理优化
def batch_sift_processing(image_paths, max_features=500):
    """批量SIFT特征检测优化"""
    results = []

    # 创建单一的SIFT检测器,避免重复创建
    sift = cv2.SIFT_create(nfeatures=max_features)

    for i, image_path in enumerate(image_paths):
        print(f"处理图像 {i+1}/{len(image_paths)}: {image_path}")

        img = cv2.imread(image_path)
        if img is None:
            print(f"跳过无效图像: {image_path}")
            continue

        # 调整图像尺寸以提高性能
        height, width = img.shape[:2]
        if max(height, width) > 800:
            scale = 800 / max(height, width)
            new_width = int(width * scale)
            new_height = int(height * scale)
            img = cv2.resize(img, (new_width, new_height))

        gray = cv2.cvtColor(img, cv2.COLOR_BGR2GRAY)

        # 检测特征
        kp, des = sift.detectAndCompute(gray, None)

        # 只保存必要的信息
        keypoint_info = [(kp_item.pt, kp_item.response, kp_item.size) for kp_item in kp]

        results.append({
            'image_path': image_path,
            'keypoints_count': len(kp),
            'keypoints_info': keypoint_info,
            'descriptors': des
        })

        # 强制垃圾回收,释放内存
        del img, gray, kp
        import gc
        gc.collect()

    return results

# 使用示例
image_list = ['/images/notes/opencv/img1.jpg', '/images/notes/opencv/img2.jpg', '/images/notes/opencv/img3.jpg']
batch_results = batch_sift_processing(image_list, max_features=300)
print(f"批量处理完成,共处理 {len(batch_results)} 张图像")